![Gamehacklab[RU]](https://gamehacklab.ru/uploads/monthly_2022_06/1_PNG_GHL_64x.png.6d61ef42c3de6821543db4c0243672ae.png)


MasterGH
-
Постов
2 999 -
Зарегистрирован
-
Победитель дней
129
Тип контента
Профили
Форумы
Загрузки
Блоги
Сообщения, опубликованные MasterGH
-
-
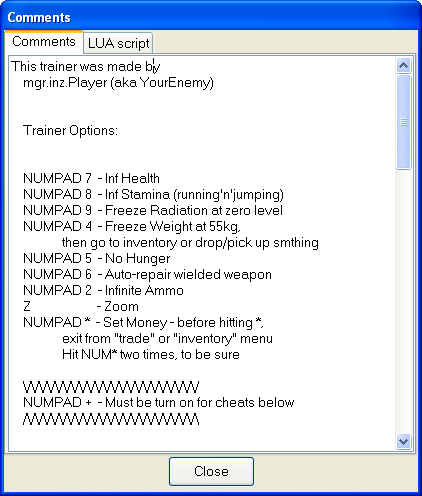
Сейчас нет.
Можно будет, если Дарк Байт сделает в будущем. Вроде, он писал что сделает.
-
Попробуй так:
_OneHitKill:
 push eax
 mov eax,[deadspace2.exe+01CB6918]
 mov eax,[eax+1EC]
 mov [pHero],eax
 pop eax

 pushfd
 cmp dword ptr [iOHK],1
 jne _ExitOHK

 cmp [pHero],edi
 je _ExitOHK

 mov [edi+000000E8],0
 movss xmm0,[edi+000000E8]
 jmp _BackOHK

_ExitOHK:
 popfd
 movss [edi+000000E8],xmm0
 jmp _BackOHK
Если не работает, то скорее всего по указателю [[deadspace2.exe+01CB6918]+1EC] проскакивает указатель на твоего героя и на других или другие указатели... Но может быть я ошибаюсь.
-
На сколько всем известно, в Cheat Engine 6 убрали возможность генерации трейнеров, но добавили lua скриптование.
Плохая идея или хорошая я пока незнаю (IMHO), но каждый раз запускать СЕ и открывать в нём таблицы со скриптами не серьёзно.
Можно открывать таблицу скриптов двойным щелчком мыши и после этого запустится CE. В зависимости от твоих настроек запустится LUA-скрипт: либо автоматически, либо с запросом о твоём подтверждении. Далее в LUA скриптах можно написать программу скрыть CE и отобразить форму "Трейнера". Таким образом CE не будет мазолить глаза.
У LUA-скриптинга для пользователей и для создателей читов есть свои плюсы и минусы. Основной плюс это сверхмалый размер LUA-трейнера для каждой отдельной игры. Точные цифры приводить не буду, сами посмотришь. Плюсов у LUA-скриптинга очень много в потенциальных возможностях: автономное исследования кода игры, GUI-отображение данных, GUI-управления через события, LUA-связь с записями в таблице CE, ассемблирование, ассемблирование посредством автоассемблера, загрузка dll-ко в процесс игры, извлечение отладочной информации... доступ практически к любым уголкам операционной системы и т.п. ... Раньше бы для этого Вам пришлось бы писать много кода на языке программирования под Windows, а теперь это у Вас всё на ладони в LUA-скриптах с доступными API для CE описанными в справочном руководстве CE. С помощью LUA Вы можете нагляднее и проще управлять поведением игры и её игровыми объектами чем если бы это делали только автоассемблером. LUA хороший инструмент наглядно показывающий логику кода... иногда его неявная типизация тоже имеет свои плюсы, некоторый его синтаксис тоже хорош. Но всё-таки у LUA есть проблемы они касаются привидения типов - например если читать данные через readBytes, то придётся постараться чтобы привести возвращаемый массив байтов к типу Word...
Из этого вытекает следующий вопрос: можно ли с помощью lua сделать форму для трейнера, или "заменить" возможность генерации трейнера собой.
Можно сделать форму для трейнера.
По вопросу чтобы "что-то чем-то заменить" я не понял.
И ещё такая идея пришла в голову: по идее с помощью lua можно сделать что-то в роде внутри-игрового меню трейнера. Т.е. к примеру нажал на F1, и на экране в процессе игры появилась меню со всеми функциями трейнера. В программировании я не селён, по-этому вопрос к знающим. Можно ли это реализовать, и если да, то как?
Можно реализовать. Если в программировании не селён, то можешь только искать уже готовое решение.
А если решишь, то можешь нчать с поиска примеров в Интернете написаний программ на DirectX на VC++ для новичков и с поисков другой информации. Есть готовые библиотеки которые помогут написать direct-x интерфейс меню... Есть статьи по работе с directx чужого приложения... Если ты в это во всё вникнешь, то сможешь реализовать свою идею в LUA-скриптах...
-
Ничего плохого в том чтобы можно было менять имя не вижу.
_
В раздел "Наши Реализы" добавлен форум "Таблицы и скрипты"
-
Напиши подробнее.
1) Рабочий адрес какого параметра ты нашёл?
2) Какая у тебя цель, что ты хочешь сделать?
3) Толком сформулируй чем тебе помочь.
-
Akama, для выявления ошибок предназначен отладчик и он тебе покажет на все твои ошибки. От тебя требуется время и умение ставить брейкпоинты, выполнять пошагово инструкции, следить за регистрами, и использовать логическое мышление - больше ничего не требуется.
-
Сложно что-то подсказать. Если бы ты описал подробно что делал, то может быть можно было дать совет. Не всегда и не все будут устанавливать игру чтобы помочь, дав готовое решение...
Вместо TSearch(дизассемблирует не правильно) используй CheatEngine. Читай статьи.
-
Обработка нажатий клавиш в трейнере.
Есть множество способов определить какие клавиши были нажаты и если была нажата определённая или определённые, то выполнить какой-то код трейнера. Обычно в таких целях принято пользоваться GetAnsyKeyState помещая его в процедуру цикла обработки сообщений трейнера, также можно воспользоваться акселераторами. Но возможно теоретически "сообщения" о нажатых клавишах могут не дойти до этой процедуры потому что код процесса игры, который написали разработчики уберёт события о клавишах из системной очереди сообщений... или же например будет включен "монопольный" режим обработки клавиш. Т.е. если вы нажмёте на определённую клавишу, трейнер работать не будет.
Команда Cheathappens стала использовать directx input хук(и) перехватывая события от клавиш клавиатуры. Не буду писать как я об этом узнал... Короче говоря стоит взять на заметку использовать directx input. Этот метод и есть выход из той ситуации которую я описал выше.
Пример:
This sample
DInput-Hook-2005-22-01.zipdemonstrates using DirectInput hooking to send key-presses to DirectInput-based applications, mostly games. It is actually more like a component in that it can readily be used as is, you'll just have to write client applications.The main component is DirectInput-Hook.dll. This DLL exports 2 functions, InstallHook and RemoveHook. The first instructs the DLL to start inspecting the names of all processes loaded afterwards in search for a specific process, and then injecting code into that process to override DirectInput8Create. The process name is specified in a registry key, HKEY_CURRENT_USER\Software\Dinput-Hook.
The DLL component intercepts requests to create GUID_SysKeyboard devices and returns a special keyboard device instead. This special keyboard device, on initialization, creates a pipe named "DInput-Pipe". Whenever IDirectInputDevice8::GetDeviceState is called to retrieve the state of the keyboard in immediate mode, the keyboard checks the pipe for any pending messages, reads them, parses them to determine what key-presses to simulate, and returns a keyboard state containing the simulated key-presses.
Message format is straight-forward: Strings containing space-seperated lists of integral scan-codes; the values for DIK_* constants.
Nothing is done with buffered input. You're free to modify the code if you like, you'll find a couple of hints in the comments.
Important things to keep in mind:
1. You must keep the DLL loaded while the target application hasn't stopped using DirectInput. Otherwise, our DirectInput interface implementor objects will be unloaded and the target application will crash.
2. Put the target process name in the registry, and call InstallHook before launching the target process.
A sample client application is provided - all it does is hook "Keyboard.exe", one of the DirectInput samples included in the SDK, and sends it 4 key-presses all the time: Escape, 1, 2 and 3.
As always, my code is public domain. APIHijack, the hooking library, is not. Contact its author for license details. 2003 and 2005 solutions are included.
-
Версия игры 1.0; версия трейнера 1.0; +2; дата создания 11.12.2009
Описание:
1) Здоровье
2) Патроны
Трейнер + таблица CE5.6: TrainerJustCause.rar
Дополнительная информация:
Статья о том как был создан трейнер (там же описания таблицы читов)
Есть сканирование сигнатур.
-
Исправил статью. Вытащил теги [TEXT], картинки залил на форум.
Встретите ещё теги [TEXT] пишите мне в личку с ссылкой на сообщение и я поправлю.
-
Надо ему это или нет (я без понятия), звать его сюда или нет это всё обсуждения не этой темы

-
Тема. Собрание хороших статей по CE
1) Новый тутор про трейсер для CE (англ) - ссылка
2) Другие статьи с того же ресурса (ссылка)
Тутоторы о том как писать сложные скрипты на автоассемблере от самого Recifense - автора небезызвестного для постояльцев на cheatEngine-форуме, пишущего очень объёмные скрипты на Автоассемблере.
Тутор "Cheating Galactic Civilization 2 (V1.0)":
1) Часть 1;
2) Часть 2;
3) Часть 3.
Кстати в своём первом туторе Автор призывает найти ссылку на "IA32_SDM_Vol2A.pdf" - документ в котором можно посмотреть описания ассемблерных инструкций. Этот документ 2007 года. Новый, вы можете найти по поиску "Intel® 64 and IA-32 Architectures Software Developer’s Manual"
-
Просьба ко всем авторам трейнеров корректировать ссылки на ваши трейнеры, т.к. с течением времени файловые обменники удаляют ваши трейнеры. Чтобы вам не приходилось постоянно заниматься перезаливанием трейнеров на сторонние хостинги все авторы трейнеров входят в группу разработчиков у которых есть возможность аттачить файлы (заливать их прямо на сервер форума).Успехов!
p.s. Авторы, имейте ввиду, что когда-нибудь администрация может удалить темы с не корректными ссылками, чтобы пользователи не тратили своё время по клику битых ссылок. Пока этого не намечается... во всяком случае любите порядок и пишете администрации если вашу тему нужно почистить от сообщений пользователей (свои сообщения авторы могут сами удалить)
-
Нет там никаких объектов. Там структура из 8-ми байт перемещается по выделенной памяти, которая то создаётся, то разрушается. В её первых 4-байтах содержится зашифрованное число1 из трейнрми по xor константе, во вторых 4-х байтах содержится число2 (он тоже зашифровано и равно "указатель на память в которой находится структура"+ "зашифрованное число" ). Где-то так, возможно я не прав. Когда ты нажимаешь на кнопку в функции1 вычитается единичка от числа2, затем в другой функции2 создаётся новая память, в неё перемещается структура с обновлением данных. Механизм я описал, а дальше сами.
Вообще если хотите моего мнения, то почти ни в одной игре не будет такого шифрования, а если будет попадётся, то тогда будите ломать голову. Я же писал трейнми (в этом разделе) который был похожий на игровой код с гораздо большей вероятностью (про объектные типы шаблона vector<T> из стандартных библиотек). А этот трейнми скорее "исключение чем правило" для любителей экзотики, написанный на MASM/TASM.
-
Информация.
1) CE периодически фиксится без уведомления в новостях на главном сайте, так что имейте ввиду. Возможно ваш баг уже исправлен.
2) В этом обзоре (наверно уже вы его видели, привожу ещё раз на всякий случай) показаны основные фишки CE 6.0 (я например узнал как пользоваться сканированием по процентам). Также вы увидите описание трейсера, установки условных бряков и увидите что-то ещё.
3) Кое-кто (mgr.inz.Player) уже успел сделать таблицу на CE 6.0 для Сталкера. Там же есть LUA + помните что в Сталкере объектные патроны, кому интересно могут посмотреть как были сделаны бесконечные патроны. Хотя я думаю, там просто автоматизирована перезарядка, с каждой перезарядкой можно создавать новые патроны. Т.е. без перезарядки беск. патроны не сделаешь простым способом. А там именно этот простой способ. Я же делал без перезарядки (только скрипт остался на харде в Москве, а сейчас не в Москве, так что посмотреть не могу)
Скрины и скрипт xrEngine.rar:
-
1) туторы LUA с форума CE - здесь;
2) последние изменения/добавления в LUA можно увидеть здесь;
3) константы здесь;
4) как работают LUA функции в коде - здесь;
О LUA в CE 6.0
LUA движок используется в Cheat Engine 6.0, а также и в множестве игр. Вспомните что у большинства компьютерных игр под Windows есть вызов игровой консоли так вот я точно не знаю, но вроде в большинстве случаев для этой консоли используется LUA движки. Например, в игре СТАЛКЕР точно есть LUA. Я всё пишу к тому, что LUA может вам пригодиться для модинга, спавна и т.п. Но сейчас речь не об этом.
О достоинствах LUA я писал в нескольких темах на форуме, одна из них.
Привожу справочный материал из справки CE 6.0
Cheat engine also has a script engine in which you can execute simple lua scripts
Моя переработанная справка по LUA-поддрежке в CE 6.0
List of CE specific functions:
readBytes(address,bytecount) : Reads the bytes at the given address and returns it
writeBytes(address, x,x,x,x) : Write the given bytes to the given address
readBytesLocal(address,bytecount) : See readBytes but then it's for Cheat engine's memory
writeBytesLocal(address, x,x,x,x) : See writeBytes but then it's for Cheat Engine's memory
readInteger(address) : Reads a integer from the specified address
readFloat(address) : Reads a single precision floating point value from the specified address
readDouble(address) : Reads a double precision floating point value from the specified address
readString(address, maxlength) : maxlength is just so you won't freeze for too long, set to 6000 if you don't care too much
writeInteger(address,value) : Writes an integer to the specified address. Returns true on success
writeFloat(address,value) : Writes a single precision floating point to the specified address. Returns true on success
writeDouble(address,value) : Writes a double precision floating point to the specified address. Returns true on success
writeString(address,string) : Write a string to the specified address. Returns true on success
generateAPIHookScript(address, addresstojumpto, addresstogetnewcalladdress OPT) : Generates an auto assembler script which will hook the given address when executed
autoAssemble(text) : runs the auto assembler with the given text. Returns true on success
showMessage(text) : shows a messagebox with the given text
sleep(milliseconds): pauses for the number of specified milliseconds (1000= 1 sec...)
getProcessIDFromProcessName(name) : returns a processid
openProcess(processid) : causes cheat engine to open the given processid
openProcess(processname): causes cheat engine to find and open the given process
pause : pauses the current opened process
unpause: resumes the current opened process
getPixel(x,y) : returns the rgb value of the pixel at the specific screen coordinate
getMousePos: returns the x,y coordinates of the mouse
setMousePos(x,y): sets the mouse position
isKeyPressed(key) : returns true if the specified key is currently pressed
keyDown(key) : causes the key to go into down state
keyUp(key) :causes the key to go up
doKeyPress(key) : simmulates a key press
messageDialog(text, type, buttons...) : pops up a message with a specific icon/sound with the specified buttons (mbok, mbyes, ....)
speedhack_setSpeed(speed)
injectDll(filename): Injects a dll, and returns true on success
Cheat table functions:
createTableEntry: creates an generic cheat table entry and add it to the list. Returns a tableentry pointer you can use with memrec routines
getTableEntry(descriptionname): returns a tableEntry pointer for use with memrec functions
memrec_setDescription(te, description): sets the specified description for this entry
memrec_getDescription(te): gets the current description of this entry
memrec_getAddress(te): returns the address and optional offsets for a pointer (note that in 64-bit kernelmode addresses will be rounded down...)
memrec_setAddress(te,address,offsets OPTIONAL) : Sets the address of a entry. You can give as many offsets as you need
memrec_getType(te) : returns the Variable type. (vtByte to vtCustom)
memrec_setType(te, vartype) : sets the type of the entry
memrec_getValue(te): returns the current value of the cheat table entry as a string
memrec_setValue(te, value): sets the value of a cheat table entry
memrec_getScript(te) : If the entry is of type vtAutoAssembler then you can get the script with this routine
memrec_setScript(te, script)
memrec_isFrozen(te)
memrec_freeze(te, updownfreeze OPTIONAL): sets the entry to frozen state. updownfreeze is optional. 0=freeze, 1=allow increase, 2=allow decrease
memrec_unfreeze(te) :unfreezes an entry
memrec_setColor(te, colorrgb): Sets the color of the entry
memrec_appendToEntry(te,te) : Adds the entry to another entry
memrec_delete(te) : It's unknown what this function does, all that is known is that after using this command other memrec routines with this table entry value don't work anymore...
Table related routines:
If a cheat entry is about to get enabled or disabled it will check if a lua function named "_memrec_description_activating" or "_memrec_description_deactivating" is available, and if so call it.
If a cheat entry is enabled or disabled it will check if a lua function named "_memrec_description_activated" or "_memrec_description_deactivated" is available, and if so call it.
It passes the tableEntry pointer as parameter
Example:
If the cheat entry table with description "xxx" gets enabled it will call "_memrec_xxx_activating(te)" before it is activated and "_memrec_xxx_activated(te)" after it has been activated (check with isFrozen to see if it actually did get activated in case of errors in a script or unreadable memory)
If the cheat entry table with description "xxx" gets disabled it will call "_memrec_xxx_deactivating(te)" before it is activated and "_memrec_xxx_deactivated(te)" after it has been deactivated
-debugging--
debug variables
EAX, EBX, ECX, EDX, EDI, ESP, EBP, ESP, EIP
RAX, EBX, RBX, RDX, RDI, RSP, RBP, RSP, RIP, R8, R9, R10, R11, R12, R13, R14, R15 : The value of the register
Debug related routines:
When a breaking breakpoint hits and the lua function debugger_onBreakpoint() is defined it will be called and the global variables EAX, EBX, .... will be filled in
Return 0 if you want the userinterface toi be updated and enything else if not (e.g: You continued from the breakpoint in your script)
createProcess(path, parameters OPTIONAL, debug OPTIONAL, breakonentrypoint OPTIONAL) : Creates a process. If debug is true it will be created using the windows debugger and if breakonentry is true it will cause a breakpoint to occur on entrypoint
debugProcess(interface OPT): starts the debugger for the currently opened process (won't ask the user) Optional interface: 0=default, 1=windows debug, 2=VEHDebug, 3=Kerneldebug
debug_setBreakpoint(address, size OPTIONAL, trigger OPTIONAL) : sets a breakpoint of a specific size at the given address. if trigger is bptExecute then size is ignored. If trigger is ignored then it will be of type bptExecute, which obviously also ignores the size then as well
debug_removeBreakpoint(address) : if the given address is a part of a breakpoint it will be removed
debug_continueFromBreakpoint(continueMethod) : if the debugger is currently waiting to continue you can continue with this. Valid parameters are :co_run (just continue), co_stepinto(when on top of a call, follow it), c_stepover (when on top of a call run till after the call)
Changing registers:
This annoying method has been chosen because LUA only supports encoding up to 52-bits, after which rounding will happen
So automatically setting the new value would surely cause unpredictable behaviour if the target app uses higher values
hasChangedARegister : Set this to true before continuing and the changedREG variables will be checked to see if the new value should be set (just an optimization so not every variable has to be checked each time even if you didn't change a thing)
changedEAX, changedRAX, changedEBX, changedRBX, changed.....
--gui--
closeCE() : just closes ce
hideAllCEWindows() : makes all normal ce windows invisible (e.g trainer table)
unhideMainCEwindow() : shows the main cheat engine window
--class-objects-
The following objects are descendent from the object named "control", therefore the returned pointer when they are created can also be used for functions that start with control_
createForm(visible OPT): creates a form (window) and returns the pointer for it. Visible is default true but can be changed
form_centerScreen(form);
form_onClose(form, function)
form_hide(form)
form_show(form)
The following create routines take an owner as parameter. Owner can be a Form, Panel or Groupbox
The x,y position will be based on the client array of the owner
createPanel(owner)
createGroupBox(owner)
createButton(owner)
createImage(owner)
image_loadImageFromFile(filename)
image_stretch(boolean)
image_transparent(boolean)
createLabel(owner)
createEdit(owner)
createMemo(owner)
control_setCaption(control, caption) : sets the text on a control. All the gui objects fall in this category
control_getCaption(control)
control_setPosition(control, x,y): sets the x and y position of the object base don the top left position (relative to the client array of the owner object)
control_getPosition(contron): returns the x and y position of the object (relative to the client array of the owner object)
control_setSize(control, width,height) :
control_getSize(control)
control_align(control, alignmentoption):
control_onclick(control, function) :
createTimer(owner)
timer_setInterval(timer, interval)
timer_onInterval(timer, function)
getAutoAttachList(): returns the AutoAttach StringList object. It can be controlled with the stringlist_ routines (it's not recommended to destroy this list object)
stringlist_add(list, string);
stringlist_remove(list, string);
object_destroy(object) : Destroys the object (basically everything inherits from this class)
1. Функции для работы с графическим интерфейсом пользователя (GUI):
1.1 Работа с GUI Cheat Engine
closeCE() : just closes ce
hideAllCEWindows() : makes all normal ce windows invisible (e.g trainer table)
unhideMainCEwindow() : shows the main cheat engine window
getAutoAttachList(): returns the AutoAttach StringList object. It can be controlled with the stringlist_ routines (it's not recommended to destroy this list object)
stringlist_add(list, string);
stringlist_remove(list, string);
Функции для работы с таблицей CE:
createTableEntry: creates an generic cheat table entry and add it to the list. Returns a tableentry pointer you can use with memrec routines
getTableEntry(descriptionname): returns a tableEntry pointer for use with memrec functions
memrec_setDescription(te, description): sets the specified description for this entry
memrec_getDescription(te): gets the current description of this entry
memrec_getAddress(te): returns the address and optional offsets for a pointer (note that in 64-bit kernelmode addresses will be rounded down...)
memrec_setAddress(te,address,offsets OPTIONAL) : Sets the address of a entry. You can give as many offsets as you need
memrec_getType(te) : returns the Variable type. (vtByte to vtCustom)
memrec_setType(te, vartype) : sets the type of the entry
memrec_getValue(te): returns the current value of the cheat table entry as a string
memrec_setValue(te, value): sets the value of a cheat table entry
memrec_getScript(te) : If the entry is of type vtAutoAssembler then you can get the script with this routine
memrec_setScript(te, script)
memrec_isFrozen(te)
memrec_freeze(te, updownfreeze OPTIONAL): sets the entry to frozen state. updownfreeze is optional. 0=freeze, 1=allow increase, 2=allow decrease
memrec_unfreeze(te) :unfreezes an entry
memrec_setColor(te, colorrgb): Sets the color of the entry
memrec_appendToEntry(te,te) : Adds the entry to another entry
memrec_delete(te) : It's unknown what this function does, all that is known is that after using this command other memrec routines with this table entry value don't work anymore...
Table related routines:
If a cheat entry is about to get enabled or disabled it will check if a lua function named "_memrec_description_activating" or "_memrec_description_deactivating" is available, and if so call it.
If a cheat entry is enabled or disabled it will check if a lua function named "_memrec_description_activated" or "_memrec_description_deactivated" is available, and if so call it.
It passes the tableEntry pointer as parameter
Example:
If the cheat entry table with description "xxx" gets enabled it will call "_memrec_xxx_activating(te)" before it is activated and "_memrec_xxx_activated(te)" after it has been activated (check with isFrozen to see if it actually did get activated in case of errors in a script or unreadable memory)
If the cheat entry table with description "xxx" gets disabled it will call "_memrec_xxx_deactivating(te)" before it is activated and "_memrec_xxx_deactivated(te)" after it has been deactivated
1.2 GUI создаваемых элементов
--class-objects-
The following objects are descendent from the object named "control", therefore the returned pointer when they are created can also be used for functions that start with control_
Создаваяемая форма:
createForm(visible OPT): creates a form (window) and returns the pointer for it. Visible is default true but can be changed
form_centerScreen(form);
form_hide(form)
form_show(form)
Другие GUI элементы:
The following create routines take an owner as parameter. Owner can be a Form, Panel or Groupbox
The x,y position will be based on the client array of the owner
createPanel(owner)
createGroupBox(owner)
createButton(owner)
createImage(owner)
image_loadImageFromFile(filename)
image_stretch(boolean)
image_transparent(boolean)
createLabel(owner)
createEdit(owner)
createMemo(owner)
Установка свойств GUI-элементам:
control_setCaption(control, caption) : sets the text on a control. All the gui objects fall in this category
control_getCaption(control)
control_setPosition(control, x,y): sets the x and y position of the object base don the top left position (relative to the client array of the owner object)
control_getPosition(contron): returns the x and y position of the object (relative to the client array of the owner object)
control_setSize(control, width,height) :
control_getSize(control)
control_align(control, alignmentoption):
Назначение обработчиков GUI:
form_onClose(form, function)
control_onclick(control, function) :
Разрушение GUI- элементов:
object_destroy(object) : Destroys the object (basically everything inherits from this class)
Показать сообщении с информацией:
showMessage(text) : shows a messagebox with the given text
messageDialog(text, type, buttons...) : pops up a message with a specific icon/sound with the specified buttons (mbok, mbyes, ....)
2. Функции связанные с процессом (игры)
2.1 Фунции управления процессом:
getProcessIDFromProcessName(name) : returns a processid
openProcess(processid) : causes cheat engine to open the given processid
openProcess(processname): causes cheat engine to find and open the given process
pause : pauses the current opened process
unpause: resumes the current opened process
sleep(milliseconds): pauses for the number of specified milliseconds (1000= 1 sec...)
speedhack_setSpeed(speed)
2.2 Функции для работы с памятью процесса (к сожалению нет readWord/writeWord):
readBytes(address,bytecount) : Reads the bytes at the given address and returns it
writeBytes(address, x,x,x,x) : Write the given bytes to the given address
readBytesLocal(address,bytecount) : See readBytes but then it's for Cheat engine's memory
writeBytesLocal(address, x,x,x,x) : See writeBytes but then it's for Cheat Engine's memory
readInteger(address) : Reads a integer from the specified address
readFloat(address) : Reads a single precision floating point value from the specified address
readDouble(address) : Reads a double precision floating point value from the specified address
readString(address, maxlength) : maxlength is just so you won't freeze for too long, set to 6000 if you don't care too much
writeInteger(address,value) : Writes an integer to the specified address. Returns true on success
writeFloat(address,value) : Writes a single precision floating point to the specified address. Returns true on success
writeDouble(address,value) : Writes a double precision floating point to the specified address. Returns true on success
writeString(address,string) : Write a string to the specified address. Returns true on success
generateAPIHookScript(address, addresstojumpto, addresstogetnewcalladdress OPT) : Generates an auto assembler script which will hook the given address when executed
autoAssemble(text) : runs the auto assembler with the given text. Returns true on success
injectDll(filename): Injects a dll, and returns true on success
2.3 Функции для работы в отладке
-debugging--
debug variables
EAX, EBX, ECX, EDX, EDI, ESP, EBP, ESP, EIP
RAX, EBX, RBX, RDX, RDI, RSP, RBP, RSP, RIP, R8, R9, R10, R11, R12, R13, R14, R15 : The value of the register
Debug related routines:
When a breaking breakpoint hits and the lua function debugger_onBreakpoint() is defined it will be called and the global variables EAX, EBX, .... will be filled in
Return 0 if you want the userinterface toi be updated and enything else if not (e.g: You continued from the breakpoint in your script)
createProcess(path, parameters OPTIONAL, debug OPTIONAL, breakonentrypoint OPTIONAL) : Creates a process. If debug is true it will be created using the windows debugger and if breakonentry is true it will cause a breakpoint to occur on entrypoint
debugProcess(interface OPT): starts the debugger for the currently opened process (won't ask the user) Optional interface: 0=default, 1=windows debug, 2=VEHDebug, 3=Kerneldebug
debug_setBreakpoint(address, size OPTIONAL, trigger OPTIONAL) : sets a breakpoint of a specific size at the given address. if trigger is bptExecute then size is ignored. If trigger is ignored then it will be of type bptExecute, which obviously also ignores the size then as well
debug_removeBreakpoint(address) : if the given address is a part of a breakpoint it will be removed
debug_continueFromBreakpoint(continueMethod) : if the debugger is currently waiting to continue you can continue with this. Valid parameters are :co_run (just continue), co_stepinto(when on top of a call, follow it), c_stepover (when on top of a call run till after the call)
Changing registers:
This annoying method has been chosen because LUA only supports encoding up to 52-bits, after which rounding will happen
So automatically setting the new value would surely cause unpredictable behaviour if the target app uses higher values
hasChangedARegister : Set this to true before continuing and the changedREG variables will be checked to see if the new value should be set (just an optimization so not every variable has to be checked each time even if you didn't change a thing)
changedEAX, changedRAX, changedEBX, changedRBX, changed.....
3. Другие функции:
getPixel(x,y) : returns the rgb value of the pixel at the specific screen coordinate
Таймер, задание ему свойства и регистрация обработчика таймера
createTimer(owner)
timer_setInterval(timer, interval)
timer_onInterval(timer, function)
Ввод/вывод:
1)Курсор мыши:
getMousePos: returns the x,y coordinates of the mouse
setMousePos(x,y): sets the mouse position
2)Клавиатура:
isKeyPressed(key) : returns true if the specified key is currently pressed
keyDown(key) : causes the key to go into down state
keyUp(key) :causes the key to go up
doKeyPress(key) : simmulates a key press
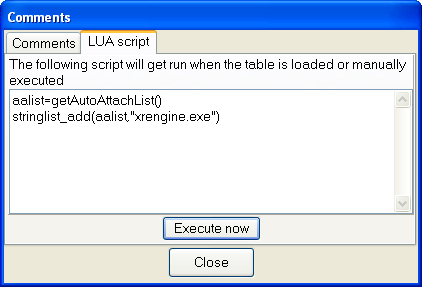
Писать код на LUA можно в двух местах.
1) Перейдите в отладчик и нажмите ctrl+L для вызова LUA engine (или вызовите из меню Tools);
2) В главном окне CE зайдите в комментарии к таблице и вы увидите там вкладку LUA.
В последнем случае LUA скрипт будет выполняться, когда вы запускаете файл-таблицу двойным кликом.
Серия моих туторов:
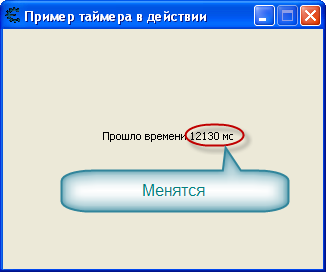
Тутор 1. Пример работы таймера
Получится у нас следующее (ссори за опечатки на скрине,там должно быть слово "Меняется")

Я покажу как создавать GUI элементы. Присваивать им название, положение. Покажу как создать таймер и его обработчик. Покажу пример конкатенации с переменной. LUA я знаю очень плохо, но если есть справочные материалы по LUA(сами поищите, я может быть позже приведу ссылки) + откройте справку CE 6.0 , то разобраться не так уж сложно если у вас есть навыки программирования на других языках.
Впишите в окно ввода следующее (в комментариях я написал подробности)

--------------------
Пример работы таймера в CE 6.0 LUA
MasterGH 2011
---------------------
]]
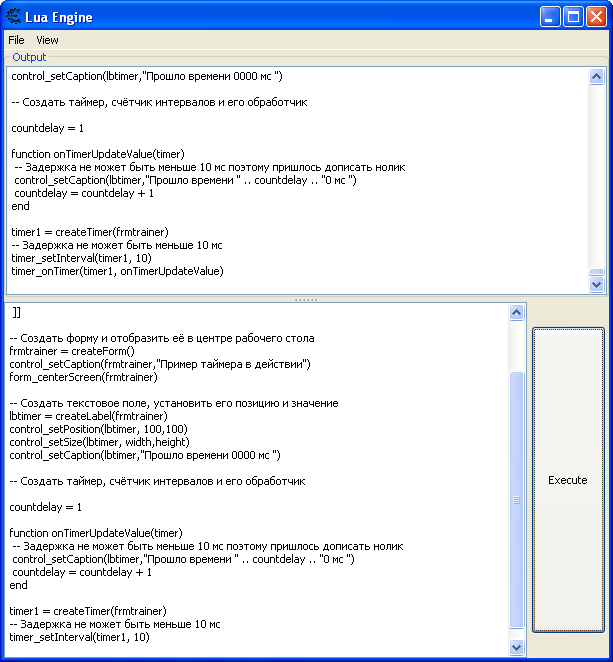
-- Создать форму и отобразить её в центре рабочего стола
frmtrainer = createForm()
control_setCaption(frmtrainer,"Пример таймера в действии")
form_centerScreen(frmtrainer)
-- Создать текстовое поле, установить его позицию и значение
lbtimer = createLabel(frmtrainer)
control_setPosition(lbtimer, 100,100)
control_setCaption(lbtimer,"Прошло времени 0000 мс ")
-- Создать таймер, счётчик интервалов и его обработчик
countdelay = 1
function onTimerUpdateValue(timer)
-- Задержка не может быть меньше 10 мс поэтому пришлось дописать нолик
control_setCaption(lbtimer,"Прошло времени " .. countdelay .. "0 мс ")
countdelay = countdelay + 1
end
timer1 = createTimer(frmtrainer)
-- Задержка не может быть меньше 10 мс
timer_setInterval(timer1, 10)
timer_onTimer(timer1, onTimerUpdateValue)--[[
Жаль что нет установки редактирования шрифтов...
Тутор 2. Как работать в отладке с LUA.
Тутор от Дарк Байта. Я просто обязан упомянуть о нём здесь. Мы получаем данные при бряках на функции PeekMessageA в данном случае получаем естественно данные стека по указателю ESP. Также хочу обратить внимание, что мы можем получать данные регистров, данные памяти, кода... анализировать эти данные; ставить по определенным условиям брейкпоинты на адресах и снимать их; получить количество срабатываемых инструкций... Иначе говоря мы можем автоматизировать управление отладкой.
Теперь теоритически можно написать подход поиска инструкций на которые не нужно ставить или нужно ставить фильтры... можно написать трейсер выводящий только нужную информацию. Возможно даже трейсер поднимающийся вверх по коду пытающийся построить цепочку указателей, но почему в LUA нет инструкции дизассемблирования по адресу (или я не нашёл???
 ) Ладно, перейдём к тутору.
Есть такая функция PeekMessage существует у любой программы.
LPMSG lpMsg,
HWND hWnd,
UINT wMsgFilterMin,
UINT wMsgFilterMax,
UINT wRemoveMsg
);BOOL PeekMessage(
PeekMessage распределяет входящие отправленные (асинхронные) сообщения, проверяет помещенные в очередь (синхронные) сообщения очереди сообщений потока и извлекает сообщение.... Ну вот наша задача собрать параметры этой функции перед её вызовом. Подключитесь к какому-нибудь поцессу и выполните следующий скрипт:
count=0;
function debugger_onBreakpoint()
if (EIP == pmAddress) then
count = count + 1
ret=readInteger(ESP)
lpMsg=readInteger(ESP+4)
hWnd=readInteger(ESP+8)
wMsgFilterMin=readInteger(ESP+12)
wMsgFilterMax=readInteger(ESP+16)
wRemoveMsg=readInteger(ESP+20)
print(count ..") PeekMessage (lpMsg="..lpMsg.." hWnd="..hWnd.." wMsgFilterMin="..wMsgFilterMin.." wMsgFilterMax=".. wMsgFilterMax.." wRemoveMsg="..wRemoveMsg..") return address="..ret)
if count>=1000 then
debug_removeBreakpoint("PeekMessageA");
end
return 1 --I handled it so dont tell the user
else
return 0 --unexpected breakpoint, show the the user
end
end
debug_setBreakpoint("PeekMessageA");pmAddress=getAddress("PeekMessageA");Например, результат будет следующий:
1) PeekMessage (lpMsg=1245020 hWnd=0 wMsgFilterMin=0 wMsgFilterMax=0 wRemoveMsg=0) return address=45325532) PeekMessage (lpMsg=1245020 hWnd=0 wMsgFilterMin=0 wMsgFilterMax=0 wRemoveMsg=1) return address=4532628
3) PeekMessage (lpMsg=1245020 hWnd=0 wMsgFilterMin=0 wMsgFilterMax=0 wRemoveMsg=0) return address=4532553
4) PeekMessage (lpMsg=1245020 hWnd=0 wMsgFilterMin=0 wMsgFilterMax=0 wRemoveMsg=1) return address=4532628
5) PeekMessage (lpMsg=1245020 hWnd=0 wMsgFilterMin=0 wMsgFilterMax=0 wRemoveMsg=0) return address=4532553
6) PeekMessage (lpMsg=1245020 hWnd=0 wMsgFilterMin=0 wMsgFilterMax=0 wRemoveMsg=0) return address=4532553
7) PeekMessage (lpMsg=1245020 hWnd=0 wMsgFilterMin=0 wMsgFilterMax=0 wRemoveMsg=1) return address=4532628
8) PeekMessage (lpMsg=1245020 hWnd=0 wMsgFilterMin=0 wMsgFilterMax=0 wRemoveMsg=0) return address=4532553
9) PeekMessage (lpMsg=1245020 hWnd=0 wMsgFilterMin=0 wMsgFilterMax=0 wRemoveMsg=0) return address=4532553
10) PeekMessage (lpMsg=1245020 hWnd=0 wMsgFilterMin=0 wMsgFilterMax=0 wRemoveMsg=1) return address=4532628
.... и так далее...
Тутор 5. Обзор GUI - элементов и работа с GUI - элементами.
GUI (или Graphical user interface графический интерфейс пользователя) имеют все оконные приложения Windows. В него входят различные элементы: форма, даилоги, кнопки, панели, лейблы(вывод одной строкой с возможностью возврата каретки и новой строки), едиты (ввод/ввод текста одной строкой), мемо(многострочный ввод/вывод) и т.п.
Перед тем как обратиться к этим элементам стоит рассмотреть управления окнами CE.
closeCE() : just closes ce (закрыть CE)
hideAllCEWindows() : makes all normal ce windows invisible (e.g trainer table) (скрыть все окна CE)
unhideMainCEwindow() : shows the main cheat engine window (показать все окна CE)
Эти команды удобны в тех случаях, когда вы создаёте LUA трейнер чтобы CE не мешался своим видом.
Ну а теперь вернёмся к GUI элементам которые можно создавать с помощью поддержки LUA. Как и положено, классически создаётся форма, затем на ней размещаются компоненты и можно показать эту форму пользователю. Когда мы будем размещать компоненты мы должны указать куда будем их размещать - на форму или другие компоненты. Иначе говоря мы должны определить владельца компонента. Также у нас будет возможность задать параметры как формы так и компонентов.
В арсенале CE 6.0 существуют следующие функции создающие GUI элементы.
createForm(visible OPT)// где можно указать OPT= true, что означает создать и показать форму.
ccreatePanel(owner) // в остальных случаях можно указывать owner - переменную владельца
createGroupBox(owner)
createImage(owner)
createLabel(owner)
createEdit(owner)
createMemo(owner)
Все эти функции возвращают указатель на созданный объект. Например:
formMain = createForm(true)
После того как мы получаем указатель на созданный GUI-объект мы можем установить его свойства или прочитать их.
1. Установка/чтение описания
control_setCaption(control, caption) : sets the text on a control. All the gui objects fall in this category
control_getCaption(control)
2. Установка/чтение позиции
control_setPosition(control, x,y): sets the x and y position of the object base don the top left position (relative to the client array of the owner object)
control_getPosition(contron): returns the x and y position of the object (relative to the client array of the owner object)
3. Установка/чтение размера
control_setSize(control, width,height)
control_getSize(control)
4. Выравнивание
control_align(control, alignmentoption)
5. И ещё
form_centerScreen(form) // расположить форму по центру
form_hide(form) // скрыть форму
form_show(form) // показать формуs
showMessage(text) : shows a messagebox with the given text // показать сообщение
messageDialog(text, type, buttons...) // диалог с кнопками
Я думаю тут всё просто.
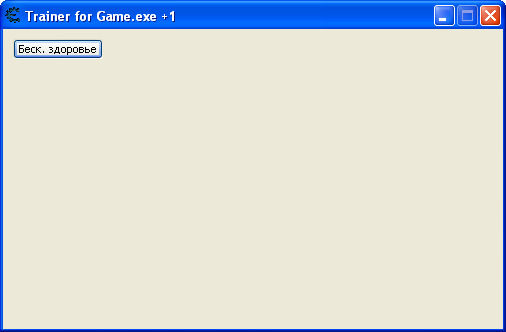
Вот мой пример создающий форму:
formMain = createForm(true)
control_setCaption(formMain, "Trainer for Game.exe +1")
form_centerScreen(formMain)
control_setSize(formMain, 500,300)Как вы могли догадаться можно создать панель и в ней расположить другие созданные элементы. С созданием интерфейса разобрались. Ну что если у нас есть кнопка, она же должна что-то делать?! А если окно трейнера закроется, вдруг мы тоже захотим при этом что-то сделать. Для таких целей существуют обработчики сообщений (или обработчики событий). У нас их для GUI элементов два.
form_onClose(form, function) // закрытие формы
control_onСlick(control, function) // клик на элементе
Когда вы видите приставку "on", то вы видите "обработчик". Так условно обозначаются обработчики событий. В следующем примере, на кнопку "вешается обработчик"
formMain = createForm(true)
control_setCaption(formMain, "Trainer for Game.exe +1")
form_centerScreen(formMain)
control_setSize(formMain, 500,300)
btn_InfHealth = createButton(formMain)
control_setCaption(btn_InfHealth, "Беск. здоровье")
control_setSize(btn_InfHealth, 90, 20)
control_setPosition(btn_InfHealth, 10, 10)
function OnInfHealth()
-- какой-то код
showMessage("Я в функции OnInfHealth")
end
control_onClick(btn_InfHealth, OnInfHealth)Забыл отменить, что комментарии в LUA обозначаются "--".
Теперь если кликнуть на кнопку, то будет вызов функции fun_OnInfHealth с сообщением об этом.

Мы рассмотрели GUI-тему и можно было бы на этом закончить обзор. Однако, вы можете обратить внимание ещё на функции создания элементов любезно предоставлены Wiccaan-ом. Вы сможете вызвать функцию создания элемента с установленными параметрами чтобы не задавать их помногу раз ручным вводом. Так же увидите код LUA в своей красе.
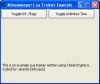
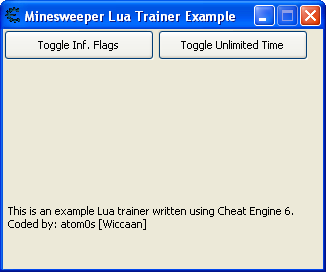
Winmine.exe (Windows XP Minesweeper) Lua Trainer Example
by atom0s [Wiccaan]
This is a demonstrational Lua script showing off
what Cheat Engine 6.0 can do with Lua.
]]--
--
-- DO NOT EDIT BELOW THIS LINE!!
--
local Trainer_Example = { }
----------------------------------------------------------------------------------
-- func: InitButton( .. )
-- desc: Wraps button creation and setup functions for smaller code.
----------------------------------------------------------------------------------
function InitButton( form, caption, x, y, w, h, func )
local button = createButton( form );
if( button == nil ) then
return nil;
end
control_setCaption( button, caption );
control_setPosition( button, x, y );
control_setSize( button, w, h );
control_onClick( button, func );
return button;
end
----------------------------------------------------------------------------------
-- func: InitLabel( .. )
-- desc: Wraps label creation and setup functions for smaller code.
----------------------------------------------------------------------------------
function InitLabel( form, x, y, text )
local label = createLabel( form );
if( label == nil ) then
return nil;
end
control_setCaption( label, text );
control_setPosition( label, x, y );
return label;
end
----------------------------------------------------------------------------------
-- func: Trainer_Example.Main( .. )
-- desc: Prepares script for overall actions.
----------------------------------------------------------------------------------
function Trainer_Example.Main( )
-- Main trainer form pointer.
Trainer_Example.Form = createForm( true );
form_centerScreen( Trainer_Example.Form )
-- Create buttons.
Trainer_Example.btnFlags = InitButton( Trainer_Example.Form, "Toggle Inf. Flags", 1, 1, 150, 30, Trainer_Example.OnFlagsClicked );
Trainer_Example.btnTimer = InitButton( Trainer_Example.Form, "Toggle Unlimited Time", 155, 1, 150, 30, Trainer_Example.OnTimeClicked );
-- Create info label.
Trainer_Example.lblInfo = InitLabel( Trainer_Example.Form, 5, 175,
"This is an example Lua trainer written using Cheat Engine 6.\n" ..
"Coded by: atom0s [Wiccaan]"
);
-- Create option booleans.
Trainer_Example.bFlagsEnabled = false;
Trainer_Example.bTimerEnabled = false;
-- Set form caption.
control_setCaption( Trainer_Example.Form, "Minesweeper Lua Trainer Example" );
return true;
end
----------------------------------------------------------------------------------
-- func: Trainer_Example.OnFlagsClicked( .. )
-- desc: Toggles infinite flags when flag button is clicked.
----------------------------------------------------------------------------------
function Trainer_Example.OnFlagsClicked()
Trainer_Example.bFlagsEnabled = not Trainer_Example.bFlagsEnabled;
if( Trainer_Example.bFlagsEnabled == true ) then
autoAssemble( "winmine.exe+346E:\n" ..
"db 90 90 90 90 90 90"
);
else
autoAssemble( "winmine.exe+346E:\n" ..
"db 01 05 94 51 00 01"
);
end
end
----------------------------------------------------------------------------------
-- func: Trainer_Example.OnTimeClicked( .. )
-- desc: Toggles unlimited time when time button is clicked.
----------------------------------------------------------------------------------
function Trainer_Example.OnTimeClicked()
Trainer_Example.bTimerEnabled = not Trainer_Example.bTimerEnabled;
if( Trainer_Example.bTimerEnabled == true ) then
autoAssemble( "winmine.exe+2FF5:\n" ..
"db 90 90 90 90 90 90"
);
else
autoAssemble( "winmine.exe+2FF5:\n" ..
"db FF 05 9C 57 00 01"
);
end
end
-- Execute our script.
Trainer_Example.Main();--[[
Результат:
На этом пока всё.
Тутор 7. Отображение картинок в GUI.
Я написал, такой скрипт и он не работал.
control_setSize(frm, 600,400)
form_centerScreen(frm)
img = createImage(frm)
control_setSize(img, 300,400)
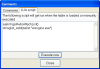
image_loadImageFromFile(img,"D:\qqq\Game.bmp")frm = createForm(true)
Я спросил у Dark Byte в чём ошибка. Он любезно написал, что можно заменить image_loadImageFromFile(img,"D:\qqq\Game.bmp") на:
image_loadImageFromFile(img,"D:\\qqq\\Game.bmp")
или
image_loadImageFromFile(img,[[D:\qqq\Game.bmp]])
Так что имейте это ввиду при создании трейнера на LUA. Я задал DB также вопрос как загрузить картинку из текущей директории без указания пути. Ведь если пользователь скопирует файлы .CT и picture.bmp, тогда у него изменится путь...
Тутор 7. Отображение картинок в GUI.
....
Я задал DB также вопрос как загрузить картинку из текущей директории без указания пути. Ведь если пользователь скопирует файлы .CT и picture.bmp, тогда у него изменится путь...
Пришёл ответ. Это возможность пока не поддерживается. Но в будущей версии 6.1 уже поддерживается загрузка картинок с ресурсами форму из IDE LUA. Причем картинки разных форматов, а не только bmp.
Можете посмотреть на результат.
Картинка весит ~70 кб. Файл скрипта весит в два раза больше. Учитывая то, что кроме картинки больше ничего нет. А знаете почему. Потому что скрипт это xml разметки и картинка преобразуется в нём в текстовый вид байтов.
<CheatTable CheatEngineTableVersion="10">
<Forms>
<UDF1>5450463007544345466F726D0455444631044C65667403A30106486569676874039F0003546F7003C401055769647468034301084175746F53697A65
//.......................... (вырезано мной)
FD9000000</UDF1>
</Forms>
<CheatEntries/>
<UserdefinedSymbols/>
</CheatTable><?xml version="1.0"?>
Если картинку удалить, то скрипт занимает 301 байт.
<CheatTable CheatEngineTableVersion="10">
<Forms>
<UDF1>5450463007544345466F726D0455444631044C6566740360010648656967687403F00003546F70038F010557696474680340010743617074696F6E0604554446310000</UDF1>
</Forms>
<CheatEntries/>
<UserdefinedSymbols/>
</CheatTable><?xml version="1.0"?>
Также хочу напомнить, что очень важен именно такой тип трейнеров зависящих от установленной Cheat Engine, а не автономно работающих отдельно от CE. Почему спросите вы? Я отвечу:
1) Очень важно - в любой момент можно проанализировать и изменить скрипт.
2) Автономные трейнеры от CE не подходят (хотя их тоже можно открыть в CE и редактировать). Они не подходят и логически и из-за увеличения размера в базе данных, которая будет и без того разрастаться. Логически одна часть программы должна быть на компьютере пользователя и должна строить интерфейс трейнера по разметке. Разметки, т.е. скрипты уже пользователь может качать хоть откуда. Если пользователь не будет размещать в своём трейнере картинок, то его разметка будет меньше 1 кб. Сравните самый маленький трейнер обычно больше 2 кб. А в основном делают трейнеры которые больше 20 кб. Если паковать/распаковывать в огромной базе, то это будет ненужной работой процессора, который будет работать с базой данных.
Одно дело когда мы хотим скачать трейнер пусть даже размером 1 мб. Мы его скачаем попользуемся и удалим. Другое дело быть человеком который хранит множество трейнеров, чтобы другие ими пользовались. И тут встаёт вопрос. Во всех трейнерах есть множество повторяющейся логической информации: код создание окна, обработчики сообщений, PE формат исполянемых файлов. Всё это мусор когда терйнеров больше одного. Мы должны работать только с той информацией которая удобна и которая не повторяется от трейнера к трейнеру. Решение это именно таблицы Cheat Engine: LUA скрипты + автоассемблер + подгрузка dll-ок. Больше ничего геймхакеру и не нужно, он сосредоточиться только на инъекции кода и сможет быстро и удобно изменять её в любой момент и хранить свой труд в максимально лучшей форме - восприятии и компактности.
Какие нам нужны ещё туторы.
0) Работа с вводом/выводом (горячие клавиши, эмуляция клавиш, обработчики нажатий клавиш)
1) Отображения информации из памяти игры в GUI элементах
2) Создание интерфейса как у трейнера с управлением активации и деактивации читов
3) По дизассемблерным инструкциям формирование автоассемблерных скриптов и читов
4) Пользователь вводит адрес параметра, после чего происходит отладка с нахождением инструкций, создаётся чит...
5) Работа в LUA с файлами
6) Создание автоматизированных сценариев в сингловых играх.
и т.п.
Резюме по LUA CE 6.0
Кстати поддержка отдельно функционирующих трейнеров будет в следующих версиях (написал Дарк Байт)
Вообще я считаю не очень стоит заморачиваться на LUA в создании трейнеров. Форму трейнера с GUI элементами по прежнему удобнее создавать в IDE VisulaStudio. Как я писал много раз я придерживаюсь модели: создания программы ланчера TrainerMAx с БД библиотек cheat.dll, которые внедряются в процесс используют базовые функции из SystemCheat.dll. И это самый лушчий способ, который я знаю в создании групп трейнеров. GUI форму можно сменить на DirectX и OpenGL.... НО LUA это хороший эксперимент. И все же он полезен при исследовании игрового кода, т.к. с его помощью можно автоматизировать чтение структур данных, их обработки (сравнении, выводе информации по условию и т.п.).
-
-
Объявляется благодарность Дарк Байту за создание CE и обновления до 6.0
Как жаль что тебя нет на этом форуме. Был ты на нашем форуме получил бы к уровню +100 -
Я так понял с помощью LUA скриптов можно будет добавить читы ассемблера из списка? Если да, то это здорово...
Можно будет что-то типа своего движка для трейнеров сделать...
Ага, я не подумал об этом
 . С помощью LUA можно дизассемблировать инструкции, анализировать их и составлять автоассемблерные скрипты. Их потом можно сразу использовать как чит или перед этим добавить его в таблицу читов, а после закрытия CE удалять, т.к. они создаются динамически. Также можно автоматизировать отладку по LUA если это требуется... а от пользователя потребуется только ввести начальный адрес некоторого параметра.
Программа создает папку "My Cheat Tables" в Моих документах.
ЗЫ Новая версия по лучше чем прошлае.
+1

-
Да и кстати забыл обратить внимание. Теперь CE не поддерживает создания трейнеров как самостоятельных программ как это было ранее. Но это дело двух сторон. С одной стороны - не имеет поддрежки трейнеров, с другой стороны на LUA скриптах вы можете создать "форму трейнера" и необходимые контролы

Т.е. теперь вы скриптами пишите и форму трейнера и сами читы. Затем эти скрипты аккуратно сохраняете по папкам и запускаете когда надо. Вообще хорошая идея. Однако было бы лучше если бы в CE была база данных как локальная (хотябы локальная) так и удалённая. Чтобы к этой БД можно было делать запросы и получить необходимые скрипты и описания к ним.
-
1) DEALLOC - удаление выделенной памяти
2)GlobalAlloc (уже такая директива была).
Нужна для разового выделения памяти. Пример
[ENABLE]
GlobalAlloc(mem1,500)
mem1:
// будет выделена память
[DISABLE]
// описания изменение
В этом примере при включении/выключении чита, mem1 выделиться только первый раз. Если кто-то общается с Дарк Байтом, то можете предложить ему аналогичную директиву для CreateThread которая аналогично бы работала один раз. А также ввести аналогичную директиву распрастраняющуюся на группы читов. Например, это было бы полезно если нужно выполнить какой-то поток при первой активации любого чита из группы читов.
Про активирующие скрипты - http://forum.gamehac...db0490fa0249111
3) У CE обновлён Script engine на движке LUA
С этими функциями понятно:
readBytes(address,bytecount) : Reads the bytes at the given address and returns it
writeBytes(address, x,x,x,x) : Write the given bytes to the given address
readBytesLocal(address,bytecount) : See readBytes but then it's for Cheat engine's memory
writeBytesLocal(address, x,x,x,x) : See writeBytes but then it's for Cheat Engine's memory
readInteger(address) : Reads a integer from the specified address
readFloat(address) : Reads a single precision floating point value from the specified address
readDouble(address) : Reads a double precision floating point value from the specified address
readString(address, maxlength) : maxlength is just so you won't freeze for too long, set to 6000 if you don't care too much
writeInteger(address,value) : Writes an integer to the specified address. Returns true on success
writeFloat(address,value) : Writes a single precision floating point to the specified address. Returns true on success
writeDouble(address,value) : Writes a double precision floating point to the specified address. Returns true on success
writeString(address,string) : Write a string to the specified address. Returns true on success
showMessage(text) : shows a messagebox with the given text
messageDialog(text, type, buttons...) : pops up a message with a specific icon/sound with the specified buttons (mbok, mbyes, ....)
sleep(milliseconds): pauses for the number of specified milliseconds (1000= 1 sec...)
А вот с этими уже по интереснее (по определенным условиям: работа с хуками, процессами, выполнения автоассемблерных скриптов, подгрузка dll-ок, ввод/вывод пользователя от мышки и клавиатуры, спидхак и паузы процесса позволят останавливать процесс и запускать его медленно для считывания каких-то параметров, их обработки и т.п. ):
generateAPIHookScript(address, addresstojumpto, addresstogetnewcalladdress OPT) : Generates an auto assembler script which will hook the given address when executed
autoAssemble(text) : runs the auto assembler with the given text. Returns true on success
getProcessIDFromProcessName(name) : returns a processid
openProcess(processid) : causes cheat engine to open the given processid
openProcess(processname): causes cheat engine to find and open the given process
pause : pauses the current opened process
unpause: resumes the current opened process
getPixel(x,y) : returns the rgb value of the pixel at the specific screen coordinate
getMousePos: returns the x,y coordinates of the mouse
setMousePos(x,y): sets the mouse position
isKeyPressed(key) : returns true if the specified key is currently pressed
keyDown(key) : causes the key to go into down state
keyUp(key) :causes the key to go up
doKeyPress(key) : simmulates a key press
speedhack_setSpeed(speed)
injectDll(filename): Injects a dll, and returns true on success
С этими тоже интересно - создании записей в таблице читов программным путём. Учитывая предыдущие функции по работе с процессом такие как спидхак, пауза процесса и запуск процесса, автоассемблирование, запуск потоков и т.п. можно по каким-то условиям автоматизировать добавления нужных адресов в таблицу читов для каких-то целей: готовые читы, читы для наблюдения и т.п. Поголовной замозки или заморозки по условиям для некоторых записей.
Cheat table functions:
createTableEntry: creates an generic cheat table entry and add it to the list. Returns a tableentry pointer you can use with memrec routines
getTableEntry(descriptionname): returns a tableEntry pointer for use with memrec functions
memrec_setDescription(te, description): sets the specified description for this entry
memrec_getDescription(te): gets the current description of this entry
memrec_getAddress(te): returns the address and optional offsets for a pointer (note that in 64-bit kernelmode addresses will be rounded down...)
memrec_setAddress(te,address,offsets OPTIONAL) : Sets the address of a entry. You can give as many offsets as you need
memrec_getType(te) : returns the Variable type. (vtByte to vtCustom)
memrec_setType(te, vartype) : sets the type of the entry
memrec_getValue(te): returns the current value of the cheat table entry as a string
memrec_setValue(te, value): sets the value of a cheat table entry
memrec_getScript(te) : If the entry is of type vtAutoAssembler then you can get the script with this routine
memrec_setScript(te, script)
memrec_isFrozen(te)
memrec_freeze(te, updownfreeze OPTIONAL): sets the entry to frozen state. updownfreeze is optional. 0=freeze, 1=allow increase, 2=allow decrease
memrec_unfreeze(te) :unfreezes an entry
memrec_setColor(te, colorrgb): Sets the color of the entry
memrec_appendToEntry(te,te) : Adds the entry to another entry
memrec_delete(te) : It's unknown what this function does, all that is known is that after using this command other memrec routines with this table entry value don't work anymore...
Функции по отладчику:
Работа с регистрами:
EAX, EBX, ECX, EDX, EDI, ESP, EBP, ESP, EIP
RAX, EBX, RBX, RDX, RDI, RSP, RBP, RSP, RIP, R8, R9, R10, R11, R12, R13, R14, R15 : The value of the register
Обработчик бряков:
debugger_onBreakpoint()
createProcess(path, parameters OPTIONAL, debug OPTIONAL, breakonentrypoint OPTIONAL) : Creates a process. If debug is true it will be created using the windows debugger and if breakonentry is true it will cause a breakpoint to occur on entrypoint
debugProcess(interface OPT): starts the debugger for the currently opened process (won't ask the user) Optional interface: 0=default, 1=windows debug, 2=VEHDebug, 3=Kerneldebug
debug_setBreakpoint(address, size OPTIONAL, trigger OPTIONAL) : sets a breakpoint of a specific size at the given address. if trigger is bptExecute then size is ignored. If trigger is ignored then it will be of type bptExecute, which obviously also ignores the size then as well
debug_removeBreakpoint(address) : if the given address is a part of a breakpoint it will be removed
debug_continueFromBreakpoint(continueMethod) : if the debugger is currently waiting to continue you can continue with this. Valid parameters are :co_run (just continue), co_stepinto(when on top of a call, follow it), c_stepover (when on top of a call run till after the call)
hasChangedARegister : Set this to true before continuing and the changedREG variables will be checked to see if the new value should be set (just an optimization so not every variable has to be checked each time even if you didn't change a thing)
changedEAX, changedRAX, changedEBX, changedRBX, changed.....
gui для CE для вывода интересной информации из процесса игры
closeCE() : just closes ce
hideAllCEWindows() : makes all normal ce windows invisible (e.g trainer table)
unhideMainCEwindow() : shows the main cheat engine window
--class-objects-
The following objects are descendent from the object named "control", therefore the returned pointer when they are created can also be used for functions that start with control_
createForm(visible OPT): creates a form (window) and returns the pointer for it. Visible is default true but can be changed
form_centerScreen(form);
form_onClose(form, function)
form_hide(form)
form_show(form)
The following create routines take an owner as parameter. Owner can be a Form, Panel or Groupbox
The x,y position will be based on the client array of the owner
createPanel(owner)
createGroupBox(owner)
createButton(owner)
createImage(owner)
image_loadImageFromFile(filename)
image_stretch(boolean)
image_transparent(boolean)
createLabel(owner)
createEdit(owner)
createMemo(owner)
control_setCaption(control, caption) : sets the text on a control. All the gui objects fall in this category
control_getCaption(control)
control_setPosition(control, x,y): sets the x and y position of the object base don the top left position (relative to the client array of the owner object)
control_getPosition(contron): returns the x and y position of the object (relative to the client array of the owner object)
control_setSize(control, width,height) :
control_getSize(control)
control_align(control, alignmentoption):
control_onclick(control, function) :
createTimer(owner)
timer_setInterval(timer, interval)
timer_onInterval(timer, function)
getAutoAttachList(): returns the AutoAttach StringList object. It can be controlled with the stringlist_ routines (it's not recommended to destroy this list object)
stringlist_add(list, string);
stringlist_remove(list, string);
object_destroy(object) : Destroys the object (basically everything inherits from this
Эту информацию я вам привел пробежавшись по файлу справки. Каждую строчку я её не читал, так что можете найти там ещё что-то новое.
Пока могу сделать такой вывод. До версии и во время 5,6 был упор на автоассемблер и автопоиск цепочек указателей. В новой версии 6.0 был сделан упор на скриптовом управлении (многие функции я описал выше) процессов, а также поддержку отладки 64 разрядных приложений. Написание скриптов на LUA к сожалению не для всех пользователей, а скорее для тех кто знает С/С++/LUA... Так что те кто знают те обрадуются, а те кто не знают наверно расстроятся, т.к. почти ничего не понимают.
-
 1
1
-
-
Описание:
January 10 2011:Cheat Engine 6.0 Released:It has taken a while but the wait has been worth it: Cheat engine 6.0 has been released
It's not only a new version with some new features, but a complete port from Delphi to Freepascal/Lazarus with support for 64-bit
Of course, some features could not get implemented in this new version just yet, like the directx mess and trainer creator, but they are planned to come back in the next versions. If you need to use them, just use Cheat Engine 5.6.1 instead(Check the download page if you need it). And other features have just been stripped because they where useless (hyperscan)
Of course, new stuff has been added like the VEHDebugger, improved pointerscan speed, ability to compare to the values of a saved scan, advanced scripting, etc...etc...etc...
If you encounter bugs or have suggestions, please do not hesitate to report them. If you don't I can't fix/improve Cheat Engine
Cheat Engine 6.0
Fixes:
several disassembler fixes
change by offset supports negative hexadecimal offsets
several fixes to the data dissector
Fixed simple paste
Hextype won't change pos
Changes:
Added a 64-bit version
Different compiler (uses fpc/lazarus now instead of delphi)
Addresslist has been reimplemented from scratch
Debugger has been reimplemented from scratch
Hexview has been redesigned
Added a new debuggerinterface : VEHDebugger
replaced underc with lua
Added several lua routines
pointerscanner speed increased
custom types changes from scantype to valuetypes that can be used in multiple locations
disassembler shows colors and can be configured
improvements to the stackview
added tabbed scans
standalone Trainermaker is currently not implemented
added the option to save scanresults
You can now compare the current addresslist to the values of a saved scan (first scan included)
The above also makes the percentage scans more useful, so a between % scan has been added as well
Tables can now contain lua scripts that can get executed
Table entries can execute lua scripts when enabled/disabled (see it as an extension to auto assembler)
Added conditional breakpoint
added break on data breakpoint
automated "find what accesses address" now shows a trigger count
Hotkeys on cheat entries have been improved
Temp files don't get saved in the ce folder anymore
Cheat Tables don't get saved in the ce folder anymore
Added a suggestion where you can save your tables now
Cheat table entries can now be dragged and dropped, including on top of eachother
Hexview can now show seperators any way you like
You can compare two hexviews with eachother to show the differences
Added the 7 byte hexadecimal display type
Added some extra plugin apis
Improved the change register on breakpoint gui
And lots of other stuff...
Обсуждаем новые возможности в этой теме.
-
Возможно игра берёт "куски текстов-параметров", парсит текст и изменяет параметры как требуется, затем читает параметры которые следует вывести на экран.
Ставишь бряк на запись на байт текста, когда прервётся посмотри каким образом текст менялся. Если встретишь массив символов найди на него указатели чрезе отладку и там вверх по коду пройдёшься в отладке и если сюрпризов не будет то увидишь что-то типа привидения типов из текста в числовой параметр и обратно и там уже разберёшься как подменить нужный тебе параметр.
"Код игры всегда "знает" как к какому параметру обратиться если это обращение было видно в игровом интерфейсе.
100% выход - копаться в отладке"
-
Благодарность с моей стороны:
live_4_ever, Grom-Skynet, Akama, JIeXaGAD.
- Вы входите теперь в группу Разработчиков;
- Вам доступен скрытый форум Наши реализы;
- Вы можете загружать файлы на хостинг форума (ваши файлы, трейнеры, картинки, тексты и т.п. можно аттачить к форуму чтобы они не пропали со временем);
Спасибо вам всем за участие в жизни форума!


Благодарности
in О работе сайта и форума
Опубликовано
От администрации выражается благодарность Grom-Skynet за его гиперактивность в содании трейнеров и выкладывании их на форум. Ему повышен уровень.